
Intro
Let me begin by addressing a common debate. Does the flood of booty-specific exercises help to build a solid pair of glutes? Or should you just squat, and stick to the basics? In my opinion, why one or the other? DO BOTH! Why must everything in the fitness industry be thought of as black and white? Why is everything an “or” statement? Sure, heavy compound lower body exercises should be the foundation of your approach, but if you want a solid seat cushion, you should implement hip-extension isolation exercises as well. I would suggest breaking your lower body into two different sessions. The first, a heavy compound day, where you focus on squats, dead-lifts, lunges, etc.. The second, an isolation, glute-focused day, where you implement the exercises in this weeks workout.
3 Important notes
1. Stop trying to improve your butt during your cardio sessions, it has little-to-no impact on the development of the muscle. Plus, it will not only bring down the quality of the cardio session, but it will hinder your glute workouts as well. Therefore, you will fail at not one, but both of your objectives..
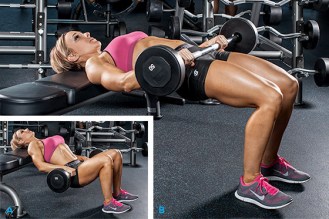
2. Do not over-emphasize the curve of your lower back to make your butt look bigger in everyday life or during your workout. Instead, keep a neutral spine. Your spine will thank you. (see image below)
3. “30 day squat challenges” are not going to cut it. Instead, go to the gym and weight train for a good bit of time. Want to build a butt? Try a “3o week challenge”.
.

Picture 1= NO
Warm-up
Cardiovascular machine- 5min-10min: I would suggest an elliptical or incline treadmill on a moderate resistance. Do not go overboard, because you do not want to hinder your lifting performance (aka, stairmaster)
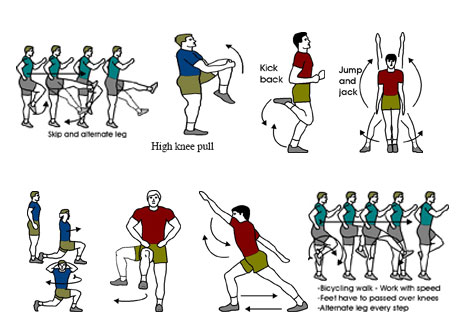
Dynamic/mobility routine- 5-10 minutes: This routine should consist of multi-joint, large muscle group movements that favor/mimic that of the workout below. You should work on passive motions in the joints to a range of motion close to functional limits. Remember, this should be moderately intense, do not go overboard. Examples of this warm up can be found at the bottom of the page.
Light warm-up sets- 2-3 sets of 10-15 reps with very moderate weight. This will familiarize the movement, and bring blood to the lower body.
Working Sets
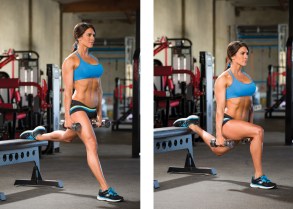
1. Dumbbell or barbell split squat: 4×15 each leg; 90s rest.
Set-up: You will need a set of dumbbells or a barbell, a bench/platform, and some coordination. Begin by standing about 2 feet out from the side of the bench, facing outward. Now, with confidence, reach back with one leg, and place your foot on the bench/platform behind you. If your distance and balance feel good, you are ready to begin. If not, do a few extremely small hops to re-position, or take your foot down,and repeat the
set-up from a better position.
Execution: You will begin the movement by moving your hips backwards and bending your knee. I typically tell my clients’ to “sit back towards the bench behind you”. With the weight almost completely distributed into the lead leg, lower until you reach parallel or lower. Then, pressing from your mid-foot, extend the hips, and rise to just before lockout of the knee; repeat.

Tips: I personally prefer using a barbell when doing this exercise, because I feel the shoulder placement emphasizes glute activation. However, for beginners and/or those less coordinated, dumbbells are the better and safer option. To help keep balance, I typically insist on constant movement. Much like a bike, pausing will make you wobble. Lastly, if you feel a burn in the leg placed on the bench, find a shorter platform to fix it.
2a. Barbell hip-thrust: 3×10-20; no rest, super-set with next exercise.
Set-up: You will need a bench, a box, or a piece of equipment specifically designed for these (I-1). You will also need a barbell and a pad (for hips). Begin by placing the very top of your back on
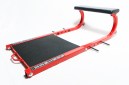
the bench, and sit on the floor. Then, roll the barbell over your legs until just above your hips. At this point, make sure and adjust your legs for an even stance.
Execution: Raise your hips slowly, until tight against the barbell. Grab and hold the barbell firmly to the spot that was once the crease of your bent hips. At this point, you should take a moment and place some tension into your heals, and make sure your back is at a neutral bend (see top of page). Then, thrust your hips upward until you reach a tight contraction in your glutes and hamstrings. Briefly pause and emphasize to contraction. Then, lower your hips (without bending your back!) downward until just before the starting position; repeat.
Tips: I would HIGHLY recommend introducing this exercise with no weight. This is so you can familiarize the correct mechanics, before adding the load and concentration that comes with barbell inclusion. You may also add a band to the hips and/or the knees to increase the intensity!
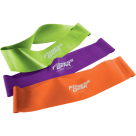
2b. Lateral band walks: 3×15 each direction; 90s rest.
Set-up: You will need a flat and wide, full-circled resistance band (I-2). I do not suggest a thin band, because it will wind up and/or move too easily. I do not suggest tying a band into a circle, because it will more than likely come apart (sketchy). You should also find an
open area at your gym.
This is the tricky part. You must find a band that will allow your feet to be as close as possible, with a tension level that doesn’t make it too hard to fully open your hips.
Execution: Begin by holding your arms in front of your body, as this will allow you to squat down without falling backwards. Then, bend at your hips until at a comfortable depth.Your back should be neutral, and your chest should be up. While keeping your knees pushed outward, step laterally in  either direction with one leg. Then, follow with the other leg. Repeat in the same direction until the reps are completed, and then reverse the direction in the same manner. You should maintain a constant depth for the entire duration.
Tips: This movement does not have to be your best squat depth, in fact, I would discourage that. Instead, go to a maintainable depth, which is usually just above parallel. You may do this exercise alternating from side-to-side if you have no adequate room, I just typically prefer the method mentioned earlier.
3a. Cable donkey kick: 3×15 each leg; superset with next exercise.
Set-up: You will need a low cable pulley, an ankle attachment, and a small platform for elevation (optional). Begin by placing one ankle in the strap, and standing on the platform with the other leg. Then, bend at your hips slightly, and grab something for stability purposes.
Execution: While keeping your body still, swing your leg backward and slightly outward (south east direction) During this motion,

your knee should be slightly bent, and your hips should remain facing forward. The movement should continue until you feel a solid squeeze in your glutes and hamstrings. Then return back to just before the starting position; repeat.
Tips: Most people over-do the range of motion. There is no need to twist your hips, rotate your leg, bend all the way over, etc. The benefits of these extra add-on movements are targeted efficiently in the other exercises. Stick to hyper extension of the hip
3b. Lumbar extension: 3×12-20 reps; 90s rest.
Set-up: You will need the equipment shown (I-3), or be creative (partner, bosu ball,ext.). Start by setting the pad to the top of your

thigh/crease of your hip. Feet should be tight to the platform and flat.
Execution: Begin by forming a neutral spine, and bracing your core. Then, slowly lean forward with all of the movement coming from your hips. Not your back, your hips. The depth of this movement varies from person-to-person (see tips). Then, with force created by your legs (not your back), raise your body back to that starting position and conract your glutes/hamstrings. DO NOT hyper extend your back (I-4). Repeat.
Tips: An easy way to determine your proper depth, is to have someone watch you from the side.

Tell them to cue you when your hips stop their movement and the back begins rolls inward. You may also hold a weight while doing this exercise.

This concludes the workout. Glute-focused days are great to pair with hamstring, calves, and quads.
STRETCH
- Do 1-2 stretch variations for each major body part
- 3-5 repetitions per stretch
- 10-20s second hold each

FOAM ROLL
Use a dense foam roller/ softball to loosen and release tension that may have resulted from the high volume above.
DYNAMIC WARM-UP
PRAY
You had another healthy workout.
Kyle Blair, BS Exercise Physiology, CPT


